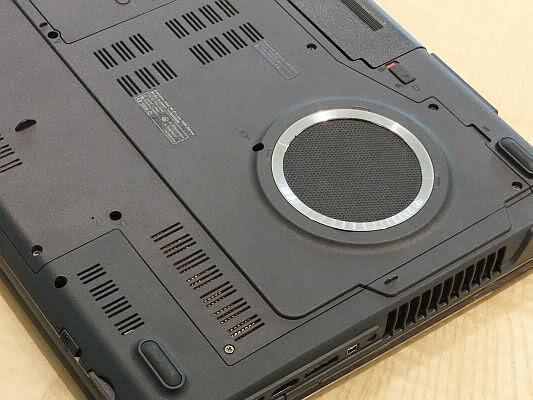
Recently I had a customer come in with a ASUS G60V Gaming Laptop. He was telling me that the laptop is getting unnecessarily hot constantly. So I checked in the overheating laptop and got to work. Looking over the computer this is what I found:
At first glance I thought, “Oh nice, this laptop actually has a great cooling system – a fan must be stuck.” But, after closer inspection, I noticed that it was just an illusion. What you see in the above picture is a silver plastic ring encircling nothing but a sticker which looks like a vent. Not a real vent, but something that is supposed to look like one. Why Asus didn’t put a real vent there instead of taking the time to factor a fake vent into their blueprints, I don’t know, especially with the overheating.
I started out by disassembling the laptop and removing all the dust and debris. Then I removed all the heatsinks, cleaned them, and reapplied new thermal compound to the CPU and GPU. After I put everything back together and performed a stress test, I found that the processor was running at a stable, normal temperature but the graphics card was cooking away at 100° C. That’s hot enough to boil water. This was pretty surprising, seeing how cold it is here in Bellevue. I took a minute to assess the problem and asked myself what I was going to do about this. Can’t very well just give it back to the customer with the laptop still running at that temperature. So I go over some options with the customer. He could either get one of those laptop coolers – but those are usually a hassle and bulky – or we could remove that fake vent and install a new (real) one. After talking it over with the customer, he gave me the green light to do some modifications.
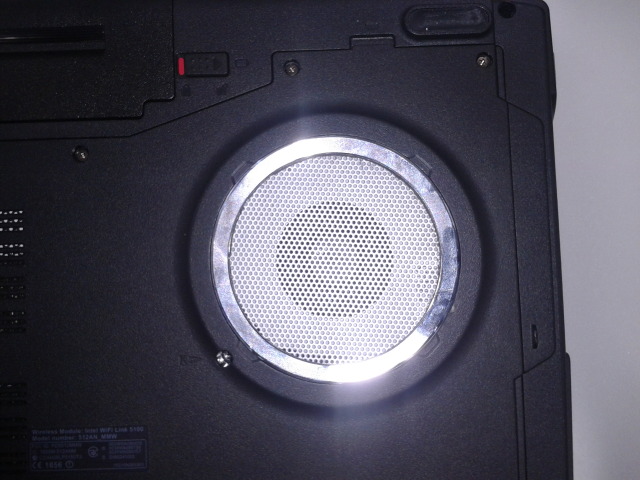
Some drilling, cutting, sanding, and mounting later, this is the end result of the custom modification:
Basically, a hole was cut where the fake sticker used to be. From there, a new silver color metal vent was secured to the plastic, and the laptop was reassembled. Now the laptop runs an average of 10-20°C cooler than before. The best part is the customer doesn’t have to carry around extra weight using a cooling pad just to use his laptop normally. Our shop isn’t just about repairing your computers, it’s about doing whatever it takes to make your experience with said computers all that much better.


Great job!
I need this done to mine!!!!! I have the exact same laptop. Awesome job man could u give me some advice as to how you did it in steps etc. or maybe a place to have it done?
Hi Matt,
First I’d recommend looking around your area for a professional shop that does this kind of work. Even though the actual modification is on the plastic casing, you still have to get the laptop completely disassembled and then reassembled after the modification, which can be tricky on some laptops. If you are comfortable with that and possibly voiding any warranties you might have then here are the steps simplified:
1. Removed “chrome” ring around fake vent, making sure not to break it, as we will be reusing it.
2. Drill 3-4 pilot holes to start the cutting of the circle.
3. Cut out the circle. Cut it too wide and you cant secure the mesh and ring, too skinny and you will be able to see the black plastic through the mesh. I used the inner diameter of the ring to give me a good starting point.
4. Cleanup the edge of the circle with sandpaper or file.
5. Cut your mesh to size (slightly larger then the inner diameter of your hole to allow somewhere to secure the mesh)
6. Install the mesh. How you secure the mesh is up to you. Some people will use glue, some screws; I would try testing different ways with some of the scrap plastic and mesh.
7. Resecured the “chrome” ring over the mesh and if you used glue give it some time to set.
And that’s it. Again I’d recommend taking it to a professional, but if you have the skills, tools, and time then you shouldn’t have too much trouble doing this.